Contents
Introduction
The modern era of mobile technology has ushered in a new age of convenience, where our smartphones serve as not just communication devices, but also as indispensable repositories of personal and professional connections.
With iPhones at the forefront of this digital revolution, it’s no wonder that they have become an integral part of our daily lives. However, as our contacts list grows over time, it can become cluttered with obsolete, duplicated, or irrelevant entries, leading to a disorganized and less efficient user experience.
This is where the importance of managing your contacts on your iPhone comes into play. Efficient contact management not only streamlines communication but also optimizes your device’s performance and ensures that your valuable personal and professional connections are readily accessible. Deleting unwanted contacts is a fundamental aspect of this management process, and in this comprehensive guide, we will walk you through the steps required to achieve this seamlessly.
Whether you are using the latest iPhone model or an older version, and regardless of the iOS version you have installed, the methods for deleting contacts remain consistent. In the following sections, we will provide you with a detailed, step-by-step guide on how to delete contacts from your iPhone, ensuring that you can keep your contacts list organized, up-to-date, and tailored to your specific needs. By the end of this guide, you will have the knowledge and confidence to efficiently clean up your contacts list, creating a more efficient and personalized iPhone experience. So, let’s embark on this journey to declutter and optimize your digital contacts world.
Accessing the contacts app:
Your iPhone’s Contacts app is the gateway to managing and organizing your vast array of personal and professional connections. In this section, we’ll delve into the process of accessing the Contacts app, ensuring you have a firm grasp of how to begin your journey toward effective contact management.
Unlock Your iPhone: Start by unlocking your iPhone if it still needs to be unlocked. You can do this by pressing the Home button (for older models) or using Face ID or Touch ID (for newer models).
Home Screen: Once you’re on your iPhone’s home screen, take a moment to locate the icon that represents the Contacts app. This icon typically features a silhouette of a person or a book. The exact location of the Contacts app icon may vary depending on how your apps are organized on your home screen.
Tap the Contacts App: When you’ve located the Contacts app icon, tap on it to open the app. Tapping the icon will launch the Contacts app, and you’ll be greeted with your contacts list.
Loading Your Contacts: After tapping the Contacts app icon, your iPhone will take a moment to load your contacts list. The loading time may vary depending on the number of contacts you have stored on your device. Once loaded, your contacts will be displayed in alphabetical order.
By successfully accessing the Contacts app, you’ve taken the first step in managing your contacts effectively. In the subsequent sections, we’ll guide you through the process of selecting and deleting contacts to help you maintain a well-organized and efficient contacts list on your iPhone. Whether you have a few important contacts or an extensive network, understanding how to access your contacts is fundamental to managing your digital address book.
Selecting contacts to delete:
Now that you’ve accessed the Contacts app on your iPhone, the next crucial step in contact management is selecting the specific contacts you wish to delete. This section will provide you with a detailed understanding of how to identify and choose the contacts you want to remove from your list.

Browse Your Contacts List: Upon entering the Contacts app, you’ll find yourself in the heart of your digital address book. Take a moment to browse through your list of contacts. Contacts are typically listed in alphabetical order by their first or last names, depending on your settings.
Scroll Through Your Contacts: To locate a specific contact, you can scroll through the list by swiping your finger up or down the screen. Depending on the number of contacts you have, this may take some time. Alternatively, you can use the search bar at the top of the screen to quickly find a contact by typing their name.
Tap on the Contact: Once you’ve identified a contact that you wish to delete, tap on their name. Tapping on a contact’s name will open their contact details, allowing you to view and edit their information.
Contact Details: Upon tapping a contact, you’ll be presented with their contact details. Here, you can see their name, phone number, email address, and any additional information you’ve stored for that contact.
By following these steps, you can successfully select a contact that you want to delete. In the subsequent sections, we’ll guide you through the process of deleting single and multiple contacts, ensuring that your contacts list is streamlined and organized according to your preferences. Whether you’re decluttering your personal contacts or fine-tuning your professional network, knowing how to select the contacts to delete is a fundamental aspect of efficient contact management on your iPhone.
Deleting a Single Contact:
After selecting a contact you wish to remove from your iPhone, it’s time to proceed with the deletion process. This section will guide you through the steps required to delete a single contact, ensuring that you can efficiently declutter your contacts list.
1. Tap the “Edit” Button:
Located in the upper-right corner of the contact’s details screen, you will find an “Edit” button. Tap on this button to initiate the editing mode for the selected contact.
2. Scroll Down to the Bottom:
Once you’ve entered the editing mode, scroll down through the contact’s details. Continue scrolling until you reach the bottom of the screen.
3. Tap “Delete Contact”:
Near the bottom of the contact’s details, you will find a “Delete Contact” option. This option is typically displayed in red to indicate that it will permanently remove the contact from your device. Tap on “Delete Contact.”
4. Confirm the Deletion:
After tapping “Delete Contact,” your iPhone will prompt you to confirm the deletion. A confirmation message will appear, ensuring that you are certain about removing the contact.
5. Confirm the Deletion (Again):
To finalize the deletion, you will need to confirm once more. This double confirmation is in place to prevent accidental deletions. Tap “Delete” again to complete the process.
By following these steps, you can successfully delete a single contact from your iPhone. This method ensures that you maintain control over your contacts list and can swiftly remove any unnecessary or outdated entries. In the subsequent sections, we will explore how to delete multiple contacts, manage contacts from iCloud and other accounts, and even provide guidance on recovering deleted contacts, should the need arise. Managing your iPhone contacts has never been more accessible, empowering you to maintain an organized and efficient digital address book.
Deleting Multiple Contacts:
If you find yourself needing to declutter your iPhone’s contacts list more efficiently, deleting multiple contacts at once can be a time-saving solution. This section will guide you through the steps required to delete multiple contacts simultaneously, streamlining your digital address book.
1. Tap the “Edit” Button:
Begin by selecting the “Edit” button, located in the upper-right corner of the Contacts app. This action will put the app in editing mode, allowing you to make bulk changes.
2. Select Multiple Contacts:
With the Contacts app in editing mode, you can now choose the contacts you want to delete. To select a contact, tap the small circle icon located to the left of their name. A blue checkmark will appear in the circle, indicating that the contact is selected.
3. Tap “Delete” Button:
After selecting the desired contacts, locate the “Delete” button, typically found at the bottom-left corner of the screen. Tap this button to initiate the deletion process.
4. Confirm the Deletion:
To prevent accidental deletions, your iPhone will display a confirmation message. Confirm your intent to delete the selected contacts by tapping “Delete” once more.
5. Confirm the Deletion (Again):
As an added precaution, your iPhone will prompt you to confirm the deletion one more time. This ensures that you are certain about removing multiple contacts. Tap “Delete” again to finalize the process.
By following these steps, you can efficiently delete multiple contacts from your iPhone at once. This method is particularly useful when you need to clean up your contacts list by removing outdated or redundant entries. In the subsequent sections, we will explore additional aspects of contact management, such as deleting contacts from iCloud and other accounts, as well as how to recover deleted contacts if needed. With these skills, you’ll be well-equipped to maintain an organized and streamlined contacts list on your iPhone, enhancing your device’s overall efficiency.
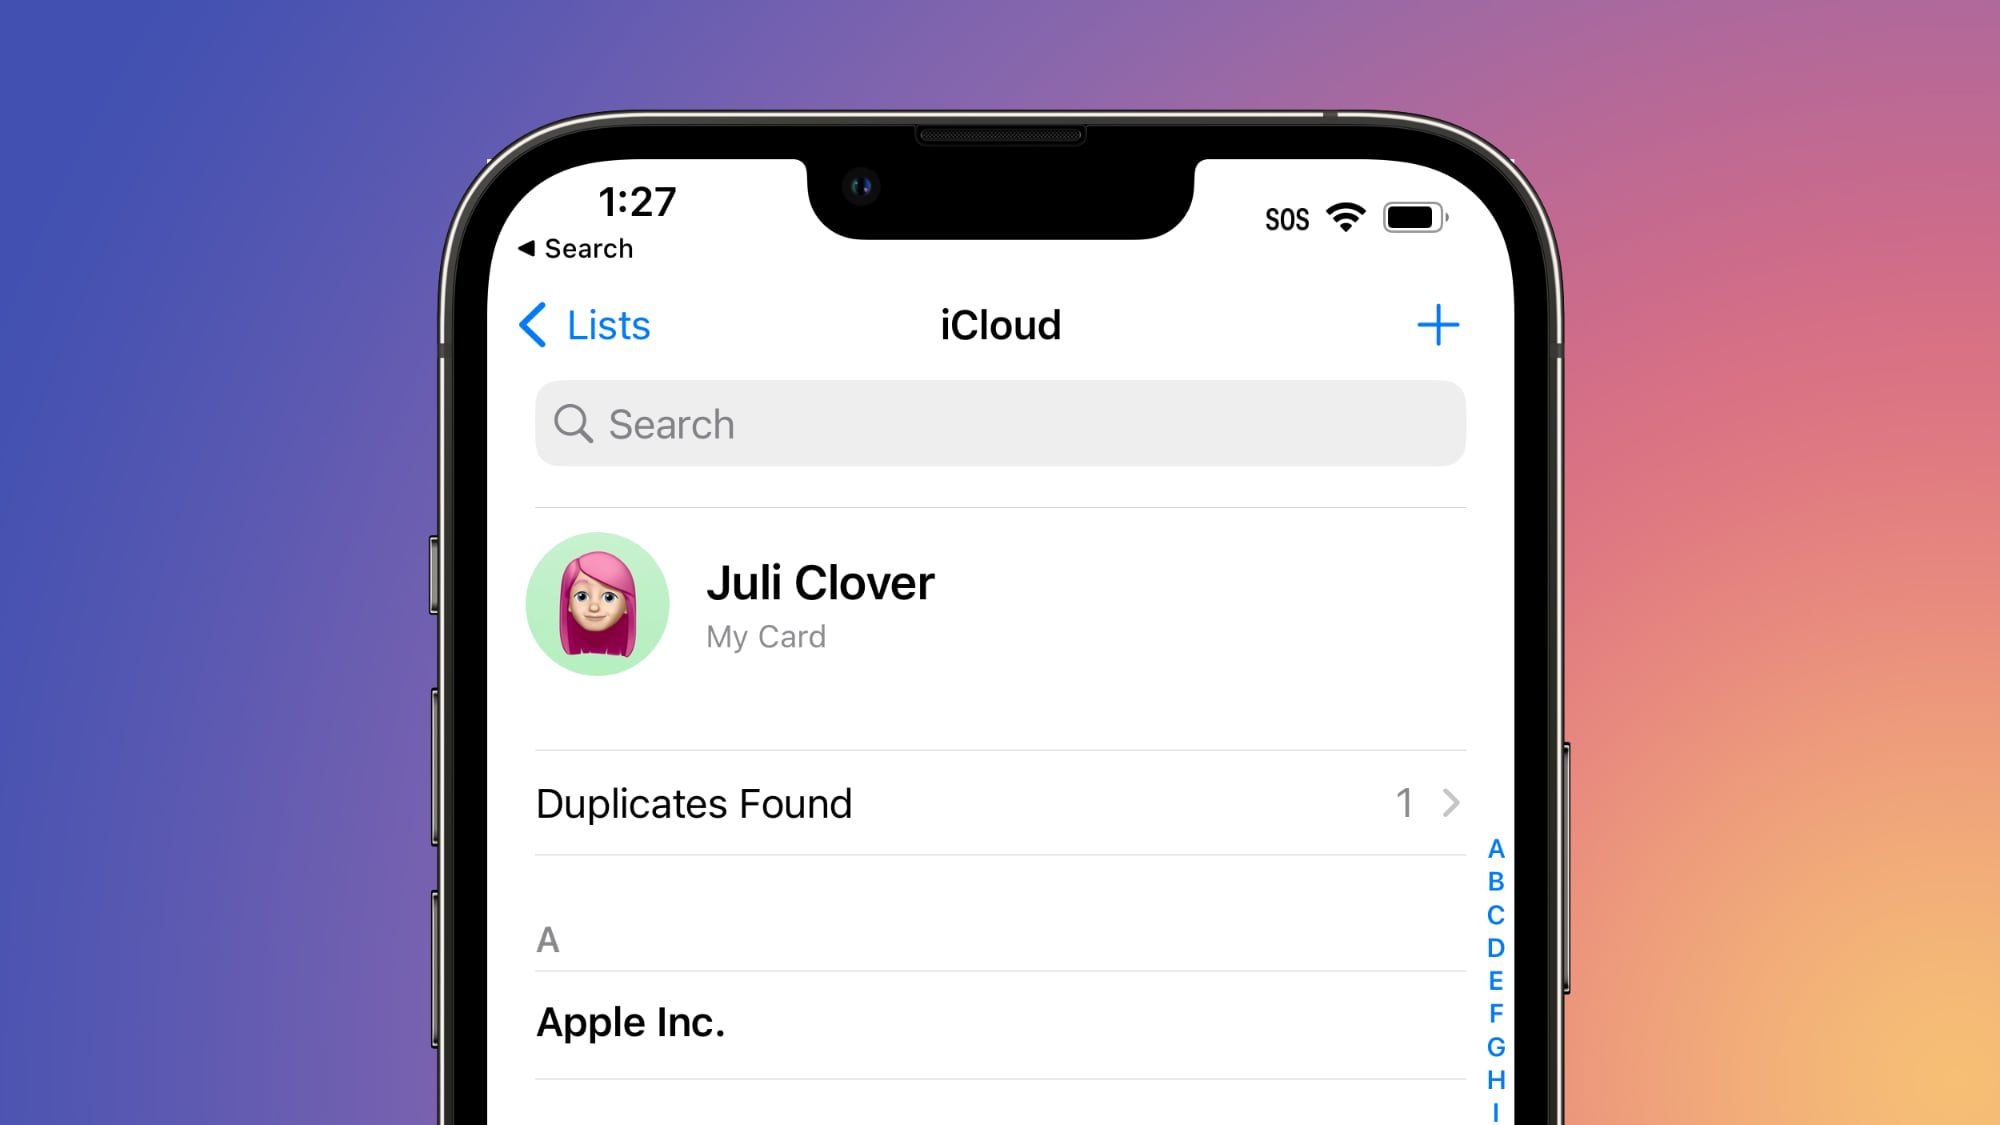
Deleting Contacts from iCloud (if applicable):
If you use iCloud to sync your contacts across multiple devices, it’s important to understand how to manage and delete contacts from this cloud-based service. Deleting contacts from iCloud ensures that unwanted or outdated entries are removed from all your connected devices. This section provides a detailed guide on how to delete contacts from iCloud, if applicable.

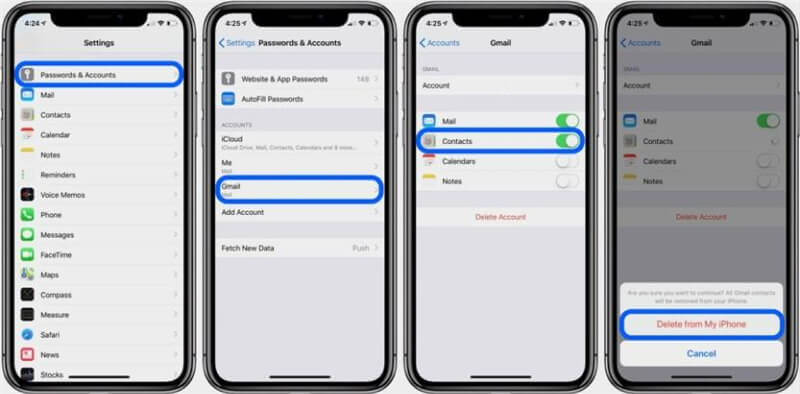
1. Access “Settings” on Your iPhone:
Begin by unlocking your iPhone and locating the “Settings” app icon on your home screen. This app resembles a gear wheel and is typically found on the first page of your home screen.
2. Scroll Down and Tap “Passwords & Accounts”:
In the “Settings” menu, scroll down until you see “Passwords & Accounts” and tap on it. This section allows you to manage various accounts associated with your device.
3. Tap “iCloud”:
In the “Passwords & Accounts” section, you’ll find a list of accounts associated with your iPhone. Locate and tap “iCloud.” This is where you manage your iCloud settings.
4. Toggle Off the “Contacts” Switch:
Inside the iCloud settings, you’ll see a list of apps and services that can be synced with iCloud. Find the “Contacts” option and tap the switch next to it to toggle it off. This action will stop the synchronization of your contacts with iCloud.
5. Choose Whether to Keep or Delete Previously Synced iCloud Contacts:
When you toggle off the “Contacts” switch, your iPhone will ask whether you want to keep or delete your previously synced iCloud contacts. Choose the option that suits your needs.
“Keep on My iPhone” will retain the contacts on your device but stop further synchronization with iCloud.
“Delete from My iPhone” will remove iCloud contacts from your device.
By following these steps, you can effectively manage and delete contacts from iCloud. This ensures that your contacts are synchronized across all your devices according to your preferences.
In the subsequent sections, we will explore deleting contacts from other accounts, provide guidance on recovering deleted contacts, and conclude with essential tips for maintaining an organized contacts list on your iPhone.
Deleting Contacts from Other Accounts (e.g., Google, Exchange):
In addition to iCloud, many iPhone users have contacts stored in other accounts such as Google, Microsoft Exchange, or other third-party services. Managing contacts from these accounts may require slightly different steps. This section provides a detailed guide on how to delete contacts from accounts other than iCloud, ensuring that your contact list remains synchronized and organized across various platforms.
1. Access “Settings” on Your iPhone:
Begin by unlocking your iPhone and locating the “Settings” app icon on your home screen. This app resembles a gear wheel and is typically found on the first page of your home screen.
2. Scroll Down and Tap “Passwords & Accounts”:
In the “Settings” menu, scroll down until you see “Passwords & Accounts” and tap on it. This section allows you to manage various accounts associated with your device.
3. Select the Account from Which You Want to Delete Contacts:
In the “Passwords & Accounts” section, you’ll find a list of accounts linked to your iPhone. Identify and select the account (e.g., Google, Exchange) that contains the contacts you wish to delete.
4. Toggle Off the “Contacts” Switch for That Account:
Inside the account settings, you’ll see a list of apps and services associated with that account. Find the “Contacts” option and tap the switch next to it to toggle it off. This action will stop the synchronization of contacts for that specific account.
5. Confirm the Deletion:
Depending on the account type and settings, you may receive a prompt asking if you want to delete contacts from your iPhone. Confirm your intent to proceed with the deletion if prompted.
By following these steps, you can efficiently manage and delete contacts from accounts other than iCloud.
This process ensures that your contact list remains organized and synchronized across various accounts and platforms. In the subsequent sections, we will explore aspects such as recovering deleted contacts, providing you with a comprehensive guide to contact management on your iPhone.
Recovering Deleted Contacts (if needed):
While cleaning up your contacts list, it’s possible to accidentally delete a contact or realize that you need a deleted contact back. Understanding how to recover deleted contacts can be a valuable skill. This section will guide you through methods to recover deleted contacts, ensuring that you can restore vital connections when necessary.
1. iCloud Contacts Restore:
- If you regularly back up your iPhone to iCloud, you can potentially recover deleted contacts through iCloud. Here’s how:
- Open “Settings” on your iPhone.
- Tap your Apple ID at the top of the Settings menu.
- Select “iCloud.”
- Scroll down and tap “Contacts” to toggle it on if it’s not already.
- Wait for your contacts to sync with iCloud and check if the deleted contact is restored.
2. iTunes Backup Restore:
- If you regularly back up your iPhone to iTunes on your computer, you can restore deleted contacts from a previous backup. Follow these steps:
- Connect your iPhone to your computer and open iTunes (or Finder on macOS Catalina and later).
- Select your device when it appears in iTunes or Finder.
- Click on “Restore Backup.”
- Choose a backup that predates the deletion of the contact and click “Restore.”
3. Third-Party Apps:
There are third-party apps available on the App Store that specialize in contact recovery. Install and use one of these apps to attempt contact recovery. Please note that the success of these apps may vary.
4. Contact Recovery Services (as a last resort):
In extreme cases, if you cannot recover the contact using the above methods, consider seeking professional contact recovery services. These services often require advanced technical expertise and may involve fees.
It’s important to remember that the success of contact recovery depends on various factors, including your backup habits and the specific circumstances of the deletion. Therefore, it’s recommended to regularly back up your iPhone to iCloud or iTunes to ensure that you have a reliable point of recovery for your contacts and other data.
By understanding and utilizing these methods, you can increase your chances of successfully recovering deleted contacts when the need arises, providing you with peace of mind as you manage and organize your iPhone’s contacts list.
Conclusion:
This comprehensive guide explored the intricacies of managing and organizing your iPhone contacts, particularly focusing on contacts synced with iCloud and other accounts. Your iPhone’s contacts list serves as a vital repository of personal and professional connections, making effective management crucial for seamless communication and efficient device usage. Let’s recap the key takeaways from this section:
1. Importance of Account-Based Contact Management:
Understanding how to manage contacts synced with iCloud and other accounts is essential for maintaining consistency across multiple devices and platforms.
2. Accessing Account Settings:
We’ve discussed how to access the “Settings” app on your iPhone and navigate to the “Passwords & Accounts” section, where you can manage account-based contacts.
3. Toggling Contacts Off:
Disabling the “Contacts” switch for a specific account, such as iCloud, Google, or Exchange, halts the synchronization of contacts with that account. This allows for tailored control over your contacts.
4. Choose to Keep or Delete Contacts:
When turning off contact synchronization for an account, you are given the option to either keep or delete previously synced contacts from your device. This choice depends on your preference and the relevance of those contacts.
5. Implications for Multi-Device Users:
Managing contacts from accounts like iCloud has broader implications, especially if you use multiple Apple devices. Changes made on one device may affect your contacts on others. Understanding this synchronization is vital.
6. Caution and Data Backup:
While managing contacts, it’s crucial to exercise caution, especially when opting to delete contacts from an account. Regularly back up your iPhone using iCloud or iTunes to ensure that you can recover contacts if needed.
By grasping the principles of managing contacts from iCloud and other accounts, you’ve gained the ability to tailor your contacts list to your specific needs and maintain a synchronized and organized digital address book. As technology continues to evolve, and as you connect with more people across various platforms, these skills will prove invaluable.
An organized and harmonious contacts list not only enhances communication but also empowers you to navigate your digital network with confidence and efficiency. So, take charge of your account-based contacts, and enjoy a more streamlined and productive iPhone experience across all your devices.